New since 23rd May 2023: This is the custom CTX-4 MDPC-X crimping tool for our 15th anniversary of MDPC-X. The CTX-4 replaces our CTX-3 crimper. This unique crimping-tool is specifically optimized to create the ideal crimp-terminal shapes for your custom sleeved cables.
This MDPC-X crimping tool is specifically made for the following wire sizes:
- Biggest Opening: 16-15 AWG (European: ~1.2 mm² to 1.5 mm²)
- 2nd biggest opening: 20-18-17 AWG (European: ~0.5 mm², 0.75 mm², 1.0mm²)
- 3rd and 4th opening: 23-26 AWG (European: ~0.14 to 0.25 mm²)
CTX-4 | Optimized for no compromise
- Based on our experiences with crimping tool optimizations since 2007 (CT-1, CT-2 and CTX-3), the CTX-4 is the latest and likely final MDPC-X crimper for (open barrell) crimp terminals like the ones used for ATX, PCIe, Dupont, Fan, Fat-4, Mini-Fit, Micro-Fit, 12VHPWR etc.
- The jaws of the CTX-4 feature a short 4th position, which is ideal for shorter than normal crimp terminals: 12VHPWR signal pins and similar very small and short crimp terminals.
- The 2 openings for 16-15 AWG (~1.2 to 1.5 mm²) and 20-18-17 AWG (~0.5, 0.75 to 1.0 mm²) wires and terminals feature the unique MDPC-X anvil designs.
- These special openings create perfect crimp terminal shapes for custom sleeved cables: There's maximum pressure force on the conductor section BUT the insulation section of your wire and crimp-terminal stays in a fully round shape, not squeezed wider than high! This ideal roundness of your wire and terminal will keep the weave structure of the cable sleeving in a perfectly symmetrical condition during the whole sleeving process.
- After fabrication, each tool is tested for this specific performance in both openings and the 2 individual test-crimp-terminals are provided with your tool.
Enjoy the ease of creating your own uncompromising custom cables with everything from MDPC-X!
Crimping guide and tutorial for the MDPC-X crimping tool:
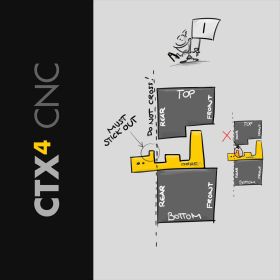
Please have a look at the image gallery of this crimping tool. It gives you a full understanding about the procedures and important details of crimp terminal positioning.
- You open the crimping tool by "closing" it. Just press the handles together and the ratchet mechanism will release the lock.
- Place the crimp terminal into one of the 4 slots with the matching size for terminal and wire. The front of the crimp terminal must stick out of the jaws-rear far enough (the images explain it best). This is the most important aspect!
- Close the tool a little bit until it squeezes down the rear-wings of the crimp terminal (the so called "insulation holders").
- Now push the uninsulated wire into the rear of the crimp terminal until the insulation stops at the narrow part in the middle of the crimp terminal (the so called "wire core holder"). The images show exactly what is meant. Insulation holder of the terminal is fully over the insulation, wire holder is completely over the uninsulated wire core.
- Now fully close the tool and it will "open" again when fully squeezed together. Done!
- You can always "pre-open" the tool by pushing the small lever (on the inside of the bottom handle) towards the front of the tool, while slightly pressing the handles together. If you experience that the front of a crimp terminal turns upwards or downwards, just place a finger underneath the crimp terminal front, which sticks out of the tool.
Easy!
The price has not changed yet. We will show it on this chart once it changes


 Instagram


1